UIC has switched from using UIC-Wireless for wifi access to UIC-WiFi. The reason for this is that UIC-Wireless used an old security method to authenticate clients, 802.1x WEP, and UIC-WiFi uses the newer, and securer, WPA2-Enterprise.
UIC-WiFi with network manager
This guide should work with any Linux distribution that uses the network manager applet. This guide was made using the GNOME Desktop environment that comes standard with Ubuntu. Basic appearance and color scheme may differ depending on distribution and settings. This guide assumes that you have the correct wireless drivers installed and that you are connecting on the UIC campus.
Step 1:
Click the network manager applet icon and select "UIC-WiFi" from the list of available networks.

Step 2:
A window should now open up similar to the one below asking for the security information. Set the security type to "WPA & WPA2 Enterprise". You should then be able to enter the rest of the information as seen below.
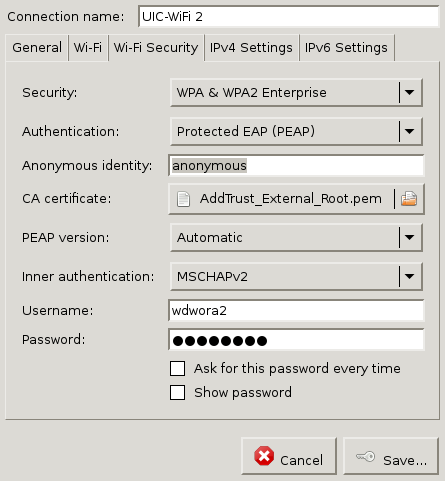
Step 3:
The location of the CA certificate, by default, should be in "/etc/ssl/certs". The certs should be installed by default on Ubuntu. If they are missing from your system then you will have to do a web search on how to install them on your Linux distribution as the package manager and names can change between different Linux distributions. The certificate you need is named: "AddTrust_External_Root.pem"

Step 4:
You should now be able to connect to UIC-WiFi, if you have any problems try going through the guide again to make sure you didn't miss something, and check that you entered the correct user name and password. Keep in mind that the UIC ACCC does not officially support Linux in any way so they will not be able to help in the event of a problem, unless you believe that there is a problem with one of their access points itself. Hopefully this guide served you well and you are now able to take advantage of Linux at UIC using the UIC-WiFi network. Read on for information of how to configure wpa_supplicant to use the UIC-WiFi network.
UIC-WiFi with wpa_supplicant
wpa_supplicant is a Linux utility for connecting to wireless networks through the command line. This section of the guide assumes you have a good amount of familiarity using the command line in Linux and will just list the configuration information that one needs to connect to the UIC-WiFi network.
The configuration info
Insert this text into your wpa_supplicant config file or in a separate file of your choice. Be sure to add your account information in the corresponding fields.
network={
    ssid="UIC-WiFi"
    key_mgmt=WPA-EAP
    eap=PEAP
    identity="<netid-here>"
    anonymous_identity="anonymous"
    password="<password-here>"
    ca_cert="/etc/ssl/certs/AddTrust_External_Root.pem"
    phase2="auth=MSCHAPV2"
    priority=1
 }
You may have to replace wlan0 with the correct name of your wireless device.
If you do not want to store your password in plain text, you can run this set of commands to get the hashed version of your password:
echo -n <password> | iconv -t utf16le | openssl md4
Then take the hash, after the equals sign, and use that as the password. You will need to do so in this format:
password=hash:<password-hash-here>
NO QUOTES, UNLIKE PREVIOUSLY
Once that is done you can connect to UIC-WiFi using these commands.
   ifconfig wlan0 up
   wpa_supplicant -B -i wlan0 -c /etc/wpa_supplicant.conf
   dhcpcd wlan0
Another option to start the wireless connection once this is done is to add this line to your /etc/dhcpcd.conf file
env wpa_supplicant_conf=<configuration_file_path>
This way any time the DHCP client is run on the wireless interface, it will automatically run wpa_supplicant on it using the specified configuration file instead of the default of /etc/wpa_supplicant/wpa_suplicant.conf.

